Friday, December 31, 2010

Lots of Love Card

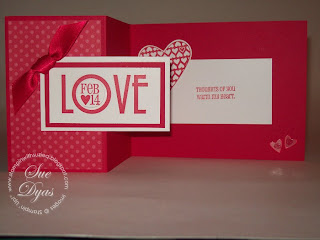
I'm so excited that I am able to have a little extra time today to share with you !!  It's the "Lots of Love" card.  This is another card from our DIVA meeting, which was created by our leader Susan Campfield! 
So now that the Christmas excitement is on the downside, it's time LADIES to get a head start on Valentine's Day!  One of my favorite days as my daughter was born on Valentine's Day!

So let's get started !!!


Here's the closed view of this lovely card. 
Don't you think that the Glimmer Paper Heart is just the Bling for this card!
It might just be the card that MDH gets this year!  But that will be our little secret, so don't tell him!


This is the opened view.  Sorry, the saying is pretty small and the focus isn't the best on this one.  
"Happy Valentine's Day"
Plus the fact that when I took these pictures it was very late. 
That will teach me to not do this when I am not awake.  LOL 
But at least you can get the general idea.

Thanks Susan for sharing this with us !!

Recipe:   Lots of Love Letterpress Plate
Cardstock: ( 2 )  Real Red  4" x 5 1/4"
Basic Black  5 1/2 " x 8 1/2",  plus a scrap for the Scallop Heart,  Whisper White  3 1/2" x 4 3/4"
Ink:  Versa Mark, Real Red
Glimmer Paper, 5/8" Basic Black Satin Ribbon, Full Heart Punch, Small Heart Punch,
Scalloped Heart of Hearts Embosslit, Teeny Tiny Wishes
and of course the Big Shot!  I hope that you remembered to put this on your Santa List!
If you didn't you need to be sure it's on your Valentine Want List!
Or if you can't wait til then you better check out my 24/7 Online Shopping button ( Here )

WISHING EVERYONE A SAFE AND HAPPY NEW YEAR!!!

I'm so glad that I finally decided to take the Big Leap to Join the Blogging World!
January 3rd will be 4 months!  I didn't think I would even make it a month!
A Big "Thank You" to all who have taken the time to stop by and check out my Blog!
I'll see you next YEAR !!

Happy Stamping  !!!
Sue

Wednesday, December 29, 2010

Filled With Love Bundle Card

I hope that you all had a Very Nice Holiday!  It was a quiet one here, but a busy one.  I'm looking forward to starting a New Year and being able to share all the New Stampin Things with YOU!!    However, work has been the total opposite, extremely busy.  Thus the reason for not posting until now. 

So I thought I would share a "Filled With Love" card, since it is the current Promotion until January 24th!  Where if you order the Filled With Love Bundle seen (here) you'll receive the Bitty Buttons for FREE.  That's a $4.95 Value!  So don't miss out on getting some FREE product and have a head start on your cards for Valentine's Day! 


This is the closed view of this cute card, which was one of our make & takes from our DIVA meeting.
                          Created by our leader Susan Campfield.


This is the opened view of this cute card!
 I just love the heart bitty buttons on the bottom right hand side of this card.

Recipe:
Stamp Set:  Filled With Love
Cardstock:  Real Red  4 1/4" x 11" scored @ 2 3/4 ",  5 1/2"
                                   3 1/4" x 1 3/4"
  Whisper White  ( 2 ) pieces 3 1/2" x 2"
     3" x 1 1/2"    plus a scrap for the Feb 14th and the Inside Heart
Designer Paper:  Love Patterns - Real Red    2 1/2"  x 4"
5/8" Real Red Satin Ribbon, (2) Heart Bitty Buttons, Mini Glue Dots, Dimensionals, Full Heart Punch, 1/2" Circle Punch

Thank You Susan for sharing this card !

I feel so much better now that I was able to share with You!

Happy Stamping!
        Sue

Wednesday, December 22, 2010

My Christmas Gifts for the Grandkids Part 2 !

Only 3 more days til Christmas, and their packages are in the mail and on their way to the Grandkids!
As promised here is part 2 of  My Christmas Gifts for the Grandkids.

So here they are again wishing everyone a very "Happy Holiday".


So let's get started with the next gifts for them.


The Mitten Gift Card Holders and the M & M Santa Bags
So I guess you could call this one kinda of a Santa Theme.  The Mitten Gift Card Holder was a Make & Take from our monthly meeting in November created by Terri Snider.  Again,  I've seen alot of the mittens gift cards and I think they're just too cute! The Thumb being made by the Two Step Bird Punch is what intriqued me.  The directions are in my earlier post  ( Here ) 
The M & M Santa Bags - the bags have always been a big hit and I first saw this idea on Becky Roberts' blog.  They are super easy to make !  You will need some 1" x 8" Clear Bags and some M & M's.  Then decorate the Top for that Special Holiday or Event.  Becky made these for an Event at her son's school.  
Stamp Set is:  Jolliest Time of the Year and Perfect Punches,   Whisper White Cardstock, Rhinstones Markers :  Real Red, Basic Black, and Old Olive Stamp Pad,  with  1/4" Real Red Grosgrain Ribbon
On to the next gift.


These are the Present Gift Card Holders that I saw on Vicki Burdick's blog a while back.  I did change the Designer Paper on these to the Jolly Holiday paper.  The link on my prior post to the directions is ( Here )  I did add the "Do Not Open Till Xmas" to the bottom, just in case.  I found the cute Snowman cookie at Walmart.  Those who know me, know that I Love all kinds of Snowman. 
And now for the Finale:    Santa Lollipops


Now I usually send down some kind of outrageous lollipop at Christmas time.  Last year it was a very large Candy Cane with a Top Note Santa face.  This cute Idea I saw at our December meeting and was created by Brenda Cardinal.  She loves to create the most wonderful Big Shot Projects! 
The Santa's are made using the Scallop Circle Die, Embossed with the Petals of Plenty Embossing Folder, 5-Petal Flower Punch, 1/2" Circle Punch, Itty Bitty Shapes Circle Punch, Pillow Box Die ( This is used to make the hat on top) Actually, the Pillow Box is attached to the back of the Scallop Circle with sticky strip.  A Cotton Ball makes the fuzzy white top of the hat.  Champagne Stampin' Glitter Glass on the brim.  To make the brim, I folded over 6 scallops.  Moonlight Smooch Pearlized Accent Ink on the beard.  The Lollipop is inside the Pillow Box. 
Brenda made her's to be an Ornament for the Tree, by attaching ribbon on the back of the hat.

Thanks to Lisa, Erica, Patti, Terri, Becky,Vicki and Brenda for sharing their creativity!

That's it for the Christmas Gifts this year !!!   Here's Wishing You and Yours a Wonderful Holiday !!

If you have any questions, you can send me an email:  sdyas0936@msn.com


Happy Stampin"
       Sue


Monday, December 20, 2010

My Christmas Gifts for the Grandkids !

It's getting so close to Christmas, only 5 more days I always make some things for the Grandkids especially for Christmas.   This year I'm really pushing my time to the limit in getting this in the mail.  So before I packaged everything up I did take some pictures.  There are several to show you, I will show you half today and then half on Wednesday.

First,  I wanted to share a picture of my two darling grandkids with you.  I'm sure that they are wishing everyone a very "Happy Holiday". 


I should also tell you that I like to do a theme each year, however this year there seems to be several themes.    So here is the first theme which is the "Penquin Theme".  The Penquin Favor Box is filled
with Tootsie Rolls, as that is my grandson's favorite treat!


The original ideas for these cute little Penquins are from Lisa Young.  She is quite a creative lady!  I love that she does so many cute Punch Art items and they are so Fun to make!   Lisa has directions on her blog  for both the Favor Box and the Candy Wrapper  Click here for the Favor Box.   Click here to the Candy Wrapper  Thanks Lisa for sharing these cute little guys!

Next up, we have the Reindeer Soap Holder and the Santa Bitty Box with "Dove" chocolate inside. 
So my Reindeer and Santa Theme.


The original idea for the Soap Holder is from Erica Cerwin.  This is my 3rd take on her idea, and I have copied the link from my prior post  ( Here )  for directions.   I used Real Red, Crumb Cake, Early Espresso,  Basic Black, Candy Cane Christmas Designer Paper.  Wide Oval Punch, Boho Blossoms Punch, 1/2" Punch, Scribbles Swirls Embosslit and 1/4" Punch (retired).


The Santa Bitty Box is from Patti Lee and I just had to make these for the grandkids too!   I have copied the link from my prior post  ( Here )
I used Real Red, Shimmery White, Basic Black, and Blush Blossom (retired) cardstock. 1 3/4" Circle Punch, Wide Oval Punch, 1/2" Punch, Ornament Punch, 2 Step Bird Punch, Polka Dot Embossing folder.


Here's the opened view.


Next up is the Naughty or Nice Note Pad Holder.  I actually found some pencils that say Naughty on one side and Nice on the other side.  Then the Note Pad that says Naughty or Nice.  They are just too Cute!
So this would go along with my Santa Theme actually.


This is my 2nd take on this idea from Terri Snider a fellow demonstrator from my group.
I have the link to my prior post ( Here )   where you can find the directions.  I used Real Red cardstock and Real Red 1/4" grosgrain ribbon.  Candy Cane Christmas Designer Paper.

That's the first half of the Christmas Gifts for the Grandkids.  Don't forget to stop by on Wednesday and check out the rest of the fun Gifts that I am sending down their way this year!   Enjoy !!

Happy Stamping !!
       Sue

Saturday, December 18, 2010

A Christmas Cupcake Box

For our December DIVA night we exchanged gifts as a special treat at our meeting.  Everyone that wants to participate brings a gift to exchange.  All the gifts are placed in the center of the table.  All the names are put in a tin and then to start the first name is drawn.  When your name is drawn you choose a gift to open.  The person who made that gift will say it's their's.  After the gift is opened then that person draws the next person's name until all the gifts have been exchanged.  It's always so fun to see all the gifts, as there are so many ideas and it's really hard to wait until your name is drawn.  This was my gift for the Exchange that night.  It's the Cupcake Box that was in Becky Robert's 12 Days of Christmas 2010 Edition Tutorial.  Click the link (Here) to order the Tutorial You still have time to create this special gift for someone for Christmas!


This is the closed view of the cupcake box.  Terri was the lucky one to receive this gift from me!


This is the opened view of the cupcake box.  There are 2 Cupcakes with chocolate inside, 8 mini cards and envelopes, and 10 Christmas tags.  This was such a FUN gift to give and so easy to make !!!

Thanks again Becky for sharing your tutorial!!

Only 7 more days until Christmas !!!

Happy Stamping !!
        Sue

Friday, December 17, 2010

New Filled With Love Promotion Starts Today!


Did you know there was a valentines bundle out?
                              

Valentine's Day is the second highest card-giving holiday next to Christmas and Stampin' Up! has a new promotion for us!

Starting tomorrow, from December 17, 2010, through January 24, 2011, receive a FREE package of Bitty Buttons (a $4.95 value) when you purchase the Stampin' Up! Filled with Love Bundle.


The Filled with Love Bundle contains the Filled with Love Stamp Set (in wood-mount or clear-mount) and the exclusive Love Patterns Designer Series Paper Pack. The Bitty Buttons are a great addition to the bundle.  Just think of all the cute things you can make using them!
                                   Filled with love page 1                              

                    
The Filled with Love Bundle contains the Filled with Love Stamp Set (in wood-mount or clear-mount) and the exclusive Love Patterns Designer Series Paper Pack. The Bitty Buttons are a great addition to the bundle. So many cute things you can make with using them!


                                        Bitty buttons                             

 It would also make a GREAT CHRISTMAS gift, and it includes
a FREE package of buttons.                  

To order the Filled With Love Valentine's Bundle or any other products, please visit my online store  ( Here )

                                        Happy Holidays  !!!
                                               Sue
                          

Thursday, December 16, 2010

A Cute Little Cupcake in it's own Individual Cupcake Box

It's a Becky Robert's day today! 

First thing that I have to share with you today, is this adorable Individual Cupcake Box that was created by Becky Roberts.  
Becky has the instuctions on how to make these Cute Cupcake Boxes on her blog   (Here)

The Cute Little Cupcake that goes inside of the Individual Cupcake Box is one of the projects
in Becky's  -  12 Days of Christmas 2010 edition Tutorial.  
All you have to do is click on the link ( Here ) to order it.

Thanks Becky for sharing your creativity !!


So that would now be 2 Cute Projects, Right?


You know, you could put a small Christmas gift inside or maybe some CHOCOLATE!  You could even put a Simply Adorned Necklace inside.  If you don't have one or if you would like to order a Simply Adorned Necklace, you can go shopping on my website on the right hand side bar. 
What a wonderful surprise that would be for a special friend at Christmas time!

So here is the picture of my individual Cupcake Box with the Cute Little Cupcake inside. 


And the picture below is of the Cupcake outside of the Individual Cupcake Box.   These are just way too CUTE!


Remember there is still time to get those final homemade gifts ready in time for Christmas!    So don't delay any longer!


Happy Stamping !!
        Sue

Tuesday, December 14, 2010

Holiday Swap Cards

I do apologize for the delay and not posting for the past few days.  We took a little vacation to Phoenix and Las Vegas!  We had a wonderful time visiting a good friend, taking in a WILD hockey game and then while  in Las Vegas we saw Andrea Bocelli at the MGM Grand.  The weather was wonderful !!  We even MISSED the Huge Awful Snow storm back home over the weekend. 

But for now to catch up on a few things. 

Our Holiday Dinner was so much FUN!  Everyone had a wonderful time and it was so nice to be able to spend some quality time with the girls!  As promised I have the pictures of the swap cards that were exchanged that night.   No particular theme, we left that open.  So let's get started.


Created by Tasha


Created by Traci


Created by Erin


Created by Dawn


And this one is my creation. 
My picture really doesn't show the detail of this card.  Must mean that I need a new camera, right? 
I totally cased this card which was created by Chat Wszelaki. 

That's all for now, but I have several other ideas to share with you this week. 
So be sure to check back in, so you don't miss out on the ideas !!!

Thanks go out to all my Stamp Club girls for such a Wonderful Holiday celebration !! 
We were missing Lisa that evening as she was not feeling well and had to stay at home that night.  

Happy Stamping !!
       Sue

Monday, December 6, 2010

Present Gift Card Holders

It's been a busy weekend as I am working on Christmas items.  Remember the Present Gift Card Holder that Vicki Burdick did?  This was from my prior post as one of the November Stamp Club Projects.  ( Here )
The prior post does have the link to Vicki's Blog for directions.   Or you can click here (for directions from Vicki's blog)    Thanks again Vicki for sharing this idea!


Well I made a different version for the Grandkids as one of their Christmas Gifts will be a gift card.


This one uses the Jolly Holiday Designer Paper.  You know that I just LOVE this paper!!!

Recipe:
Stamp Set used was Punch Pals
Cardstock:  Old Olive, Cherry Cobbler, Very Vanilla
Cherry Cobbler Seam Binding, Deck the Halls Buttons, Small and Large Oval Punches, Scallop Circle Punch

Hope you are getting ready for the Holidays !!

Happy Stamping !!
Sue

Friday, December 3, 2010

Watercolor Wonder Crayons Now Available!

Watercolor Wonder Crayons Now Available!

                             Waterciolor crayons
Great news! The Watercolor Wonder Crayons are now available for purchase.
The wait is over! :)

Use the following item numbers to purchase your Watercolor Wonder Crayons:

•120949 New Color Kit
•119802 Subtles
•119803 Regals
•119804 Brights
•119805 Neutrals

Thanks for your patience!

Wednesday, December 1, 2010

December Stamp Club Holiday Dinner

Well it's been a few days since I posted. I've been busy getting ready for the Holiday Stamp Club Dinner on Thursday.

We have a very FUN evening planned for this Thursday. We'll start it off with a wonderful dinner. Everyone is pitching in on helping out with this feast! After a relaxing Dinner, we'll be having a Card Swap. This is a Special Treat for sure. I'll be sharing ALL the cards later on probably next week.  For today I will be sharing my Special Gifts to my Stamp Club Ladies.


First,  here is one of my Holiday Gifts for them.  It's a "Holiday Treat Bag" with yummy chocolate inside. 
The details for this project are on my prior post ( Here ) 
Cherry Cobbler, Always Artichoke, Very Vanilla cardstock, Deck The Halls Designer paper, (retired always artichoke 1/4" grosgrain ribbon), Perfect Punches stamp set.


Second, here is my version of a Holiday Soap Holder.  "Tidings of Comfort and Joy" with the cute little Reindeer Antibacterial Soap.  I just LOVE this idea, it will work for everyone on your Gift List.  It even makes a cute little Stocking Stuffer too.   This original idea is Erica Cerwin's. 
I have a link on my prior post ( Here )  for directions. 


This is the Holiday Soap Holder Open View.


Cherry Cobbler, Always Artichoke, Very Vanilla cardstock.  Deck The Halls Designer Paper, stamp set for the saying are from the Contempo Christmas.


Their "Holiday Card"  is from an earlier post that I did with the Ghirardelli chocolate mini box, but I just couldn't resist not sharing this as my card to them for the Holidays.  It's a 3 x 3 Mini Card using the Jolly Holiday Designer paper, Wide Oval Punch, Cherry Cobbler and Very Vanilla cardstock stamp set is Bells and Boughs.


And now for the Finale:  Their Make & Take they will do after our "Holiday Dinner".  

            It's a   "Santa"   Bitty Box with "Dove" chocolate inside.    


The original idea for this cute little Bitty Box is by Patti Lee @ Creations by Patti.   ( Here )  
This is a super easy project and would be another FUN Stocking Stuffer. 

Thanks go out to Lisa Rodriguez, Dawn Griffith, Erica Cerwin, and Patti Lee for sharing their ideas !

I'm looking so forward to our "Holiday Dinner" this Thursday.  I hope that you've enjoyed the Holiday Projects !!   Give them a try and have a FUN Stamping Day !!

Happy Stamping !!
Sue

Tuesday, November 30, 2010

LAST DAY for ONLINE SPECTACULAR

You don't want to miss out on this OFFER:


Today, November 30th!!  is the LAST DAY for the Online Spectacular event.
YOU can get incredible discounts--
up to 50 %-- saving BIG on your favorite products, as well as qualifying for FREE SHIPPING with orders of $150 or more!

CLICK  ( Here )  FOR THE LIST OF DISCOUNTED PRODUCTS.


With this special and the Simply Amazing Starter Kit Special , this is YOUR last day to experience all the fun of Stampin' Up!


Do you want $310 worth of paper or digital crafting for only $87.50?

Today is the last day that you can purchase the Standard or Digital + Starter Kits for only $87.50--that is 50 percent off the regular price of $175 for over $310 worth of paper or digital crafting and business supplies!

How great is that deal!

( CLICK HERE )   to see the starter kit and the contents.


( CLICK HERE )  to learn more about Stampin' Up! opportunity and joining our family.


 Contact me   today! I am here to answer all of your questions and get you started on this amazing opportunity!

Have a Wonderful Day !!!

Saturday, November 27, 2010

Exciting News for a Special Friend!!

This is Such Exciting News I just wanted to share this with everyone!  The Goal of 10,000 recruits in 2010 has been reached and that person was Becky Roberts and her new recruit Farida!  Watch Shelli Gardner and Becky Roberts hand deliver the starter kit to Farida in person.
Congrats to Becky and A Big Welcome To Farida!!!

                                 
                                    Becky and Farida
Be sure that you click on the link below to see all the Fun.

http://www.youtube.com/watch?v=koH4BnJQ6kA

There are some additional pictures on Becky's Blog: "Inking Idaho"    ( Here )
                                    
And also on Shelli's Blog:  " So Shelli "   ( Here )

Hope everyone had a Wonderful Thanksgiving !!
                            Sue

Wednesday, November 24, 2010

A Penquin Christmas

This was an Inspiration Challenge that I found on The H2Design blog. ( Here ) The Title of this was "When is a Owl not an Owl?  Now we all know that the Owl Punch makes all kinds of fun characters.  But it makes the cutest Penquins that you've ever seen.  These Penquins are just too adorable and I couldn't resist giving it a try.  The Penquins are made by only using the Owl Punch!!    I'll give you a hint as it took me awhile to figure it out.  The wings are made from the jacket!

Thanks Helen for sharing this challenge!

So this is mine:     A Penquin Christmas


Stamp Set: Perfect Punches
Jolly Holidays Designer Paper
Ink:  Cherry Cobbler
Cardstock:  Cherry Cobbler, Old Olive, Whisper White, Basic Black and Pumpkin Pie
Punches:  Scallop Circle Punch, 1 3/8 Circle Punch, 1 1/4 Circle Punch, Scallop Edge Punch and last of course the Two Step Owl Punch

So give this Inspiration Challenge a Try !!

Have a very Wonderful Thanksgiving Day !!!
                 Sue

Tuesday, November 23, 2010

Online Spectacular Event

You don't want to miss this OFFER:


Yesterday Stampin' Up! announced the Online Spectacular event for one week only.

From now until November 30th!!

During this one week only, YOU can get incredible discounts--
up to 50 %-- saving BIG on your favorite products, as well as qualifying for FREE SHIPPING with orders of $150 or more!

CLICK ( HERE ) FOR THE LIST OF DISCOUNTED PRODUCTS.

With this special and the Simply Amazing Starter Kit Special , this is YOUR week to experience all the fun of Stampin' Up!

Monday, November 22, 2010

Mittens Gift Card Holder

I'm always looking for cute Gift Card ideas, especially around the Holidays.  Gift cards are one of the easiest ways to get that Special Person exactly what they want for Christmas or for Birthdays!  I've seen alot of the mittens gift cards and I think they're just too cute!  The Thumb being made by the Two Step Bird Punch is
what intriqued me.  So this is one of the Gift Cards that will be headed down to the grandkids.  We made these at our Monthly Meeting as one of our Make and Takes !  This was created by Terri Snider.  And these are super easy to make too !


                                This is the closed view. 


                                     This is the opened view.


Recipe: 
Cardstock :
Marina Mist  4 1/4" x 10 1/2 "  score @ 2", 6 1/4"
Real Red   2 1/4" x 4",   2 1/2" x 3 1/2",  Plus a scrap
Whisper White  2 1/4" x 3 1/4",  Plus a scrap
Candy Cane Designer Paper  2" x 3 3/4 "
Wide Oval Punch, Two Step Bird Punch, and the Word Punch make the Mittens. 
Modern Label Punch, Designer Label Punch,  2 Antique eyelets

Surprise Someone with this Cute Gift Card at Christmas!!

Happy Stamping !!
      Sue

Sunday, November 21, 2010

Candy Cane Christmas Gift Box

Well, it's been a busy week!  Birthday Celebrations, a MN WILD Hockey game, and the purchase of a brand NEW car!!!  Then Monday is our Anniversary!!!  Which is why you haven't seen much the past few days.  Now that we have most of the activities out of the way, I wanted to share with you today this CUTE Candy Cane Gift Box.  Original idea was from Patti Lee  ( Here )  she made a Halloween Tower with the boxes.  I also saw the Christmas Tower of boxes that Becky Roberts made.  ( Here )   Thanks go to both Patti and Becky for sharing this gift box idea!

I'm only doing mine as an individual gift box filled with candy. 
But you could use this size box for all kinds of fun Christmas items. 

         So let your imagination run WILD!!!


Lid: 5-1/8" x 5-1/8", score 1" on all sides.
Finished lid size is 3-1/8 x 3-1/8"

Bottom box: 7" x 7", score 2" on all sides.
 Finished box size is 3" x 3"

Real Red cardstock, Real Red 5/8" Satin Ribbon, Candy Cane Christmas Designer Paper

Have yourself a wonderful day !!

Happy Stamping !!
Sue

Wednesday, November 17, 2010

French Foilage Sympathy Card

Sympathy Cards have always been difficult for me to create.  Especially, when it is for someone that you are very close to.  I needed to make a Sympathy card for my Upline who recently lost her father.  I was searching through the Stampin' Connections site in hopes of finding that Special Card.  I was so amazed when I came across this card that Jenn Picard had made for someone very close to her. 
It was perfect!

Jenn also shared a new technique with the Clear Acrylic Blocks called Shadow Stamping which she found on Dawn Olchefske's blog, Dostamping with Dawn.

You can see Dawn's video on her blog  ( Here )

Thanks Jenn for sharing this beautiful card!


This is my take of Jenn's card.


                                    Thinking of you, Susan!!

Recipe:
Stamp Set is Teeny Tiny Wishes
Cardstock - Confetti White, Soft Suede
Ink - Soft Suede, Peach Parfait, Always Artichoke, Cherry Cobbler

Please Take A Moment for Yourself and Stamp Today !!
Sue


                                 It's Simply Amazing !!


Do you want $310 worth of paper or digital crafting for only $87.50?

Starting November 15, and lasting until November 30, 2010, you can purchase the Standard or Digital + Starter Kits for only $87.50--that is 50 percent off the regular price of $175 for over $310 worth of paper or digital crafting and business supplies!

How great is that deal!

Contact me today! I am here to answer all of your questions and get you started on this amazing opportunity!

Tuesday, November 16, 2010

A Cute Christmas Snowman

Sometimes you see a card and you just have to give it a try!!  This card is one of those cards for me.  A super easy card to make for Christmas and it even has a WOW with it !  The WOW is how the scallop border was made.  Can you believe that the scallop border is made with the Fancy Flower Punch?  Well it certainly is.  Mary Fish even has a minute video that shows you how to make it.  ( Here)
Thanks Mary for sharing your video for this WOW!!  

Here is my Cased Card that I found on Mary's blog Stampin' Pretty. 
Snowman have always been something that I have collected.  So everytime I see anything with a Snowman, I have to check it out !!!  So the Cute Christmas stamp set caught my eye right off .


Be sure to watch the video to see how the scallop border is made.  That way you can use this WOW idea on some of your future cards!  This works for a 4" piece, like the one above. 

Recipe:
Cardstock - Whisper White  8 1/2" x 5 1/2",  2 1/2" x 2 1/4", Scrap for note inside envelope
Real Red -  4" x 4 3/4", Plus scrap for heart
Basic Black - Scrap for Petal Card Punch and Fancy Flower Punch
Designer Paper - Candy Cane Christmas  4" x 3"
Bitty Heart Punch, Petal Card Punch, Fancy Flower Punch, 1/8" Real Red Taffeta ribbon, Mini Clip
Black Flourish Jewels for Coal and center of Heart

Let's see what ideas you come up with.  Send me an email with a picture of your card.  (Click Here)
Then I'll post your ideas on my blog.

Happy Stamping  !!!
        Sue

Monday, November 15, 2010

Days Til Christmas Calendar

I've always wanted to make my very own Days Til Christmas calendar.  Somehow, it just didn't happen until NOW!!!
I wasn't able to attend our October downline meeting.  However, we are so lucky to have someone in our group  (That person is Carol Rosengren)  who always takes pictures for us and posts them on our group website.           A Big Thank You to Carol !!
So I was browsing through the pictures to see all the fun shares and I saw that Terri Snider had made a Days Til Christmas calendar.  It was so cute!  Terri and I are the blog browsers of the group.  So I had to ask her where she found this and how did she make it.   The idea was actually on Splitcoast Stampers in the resource section.  It is Titled as  "Advent Calendar".    So if you are a member of Splitcoast Stampers - go check it out!  If not a member yet, then sign up it's free.

Here is a picture of Terri's calendar, but she is actually not the one holding it here.  We pass all the Share items around so pictures can be taken.  Terri used a Simply Scrapping Kit and Die Cuts all from Stampin' Up.  Thank You Terri for sharing this awesome calendar!


Now here is my take on the Days Til Christmas Calendar.


 This is the full view of this FUN project !   And below is a close up, so you can see the detail of this cute Calendar.   You see I have that "Jolly Holiday"  theme going on again.  I just LOVE this Designer Paper!!


I used the Jolly Holiday Designer Paper (24 Squares 2 3/4" x 2 3/4").  Cardstock is Cherry Cobbler and Old Olive (24 Squares 3" x 3").  Timeless Type Alphabet set for the Letters and the Numbers.  Scallop Circle Punch, Tombow Mono Multi Liquid Glue
The Holly was made with the Large Oval Punch and the 1/2" Circle Punch.  Artist Canvas is 16" x 20", Wilton wedding favor tins (24), Use one Velcro dot in the center on the back of each tin to stick to the board (24). 

Be sure that you don't forget to put all kinds of candy treats and special surprises, maybe even some money in the Tins to be opened each day until Christmas !!!!

Happy Stamping !!!
     Sue

LinkWithin

Related Posts Plugin for WordPress, Blogger...