Friday, March 30, 2012

Every Bunny Easter Basket

TGIF !!!!  Friday is finally here!  Work has been super crazy and that means, less time to play and post.  I hate when that happens and it's been happening a lot lately.  So I will keep this post pretty short.  I wanted to share with you the Easter Basket that we were going to make at Stamp Club a couple of weeks ago.  That was until I found the Easter Bunny Basket that Dawn Griffith shared.


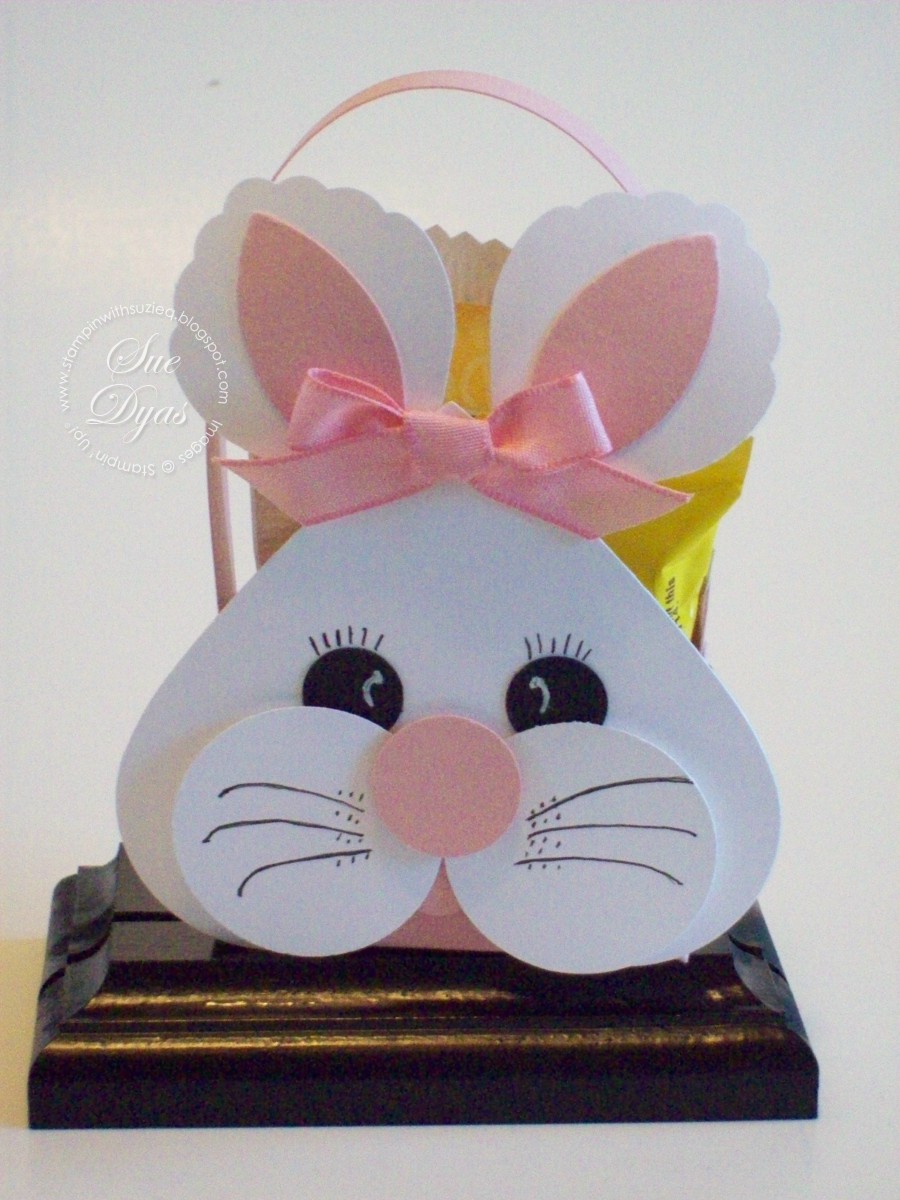
Now this is my take on the Valentine Basket, I saw over at Angie Kennedy Juda's blog.  Super cute and really easy to make.  I thought it would be perfect for an Easter Basket!  I used the Designer Paper from the Simply Scrappin' Kit - Spring Fever in the Occasions Mini.  Then using the 1 3/4" Scallop Circle Punch, the 1 3/8" Circle Punch and some Melon Mambo and Whisper White cardstock, I added my Easter touch to the Basket.  I just love the Every Bunny stamp set!  So many cute Bunnies to make a Special Easter gift with!  Angie has a video on her blog to show you how to make the basket.  Just click   ( Here )

I actually made about 8 more of these baskets for my co-workers.  They will LOVE them!!  Filled with lots of Fun Chocolate Treats!!  Only 9 more days till Easter and Only one more day left to take advantage of Sale-A-Bration !!!  Just click on the Sale-A-Bration link on my right hand side bar, before it's too late !!

Thanks Angie for sharing this cute basket idea !!!

Thanks for stopping by today!        
I hope you have a wonderful weekend!  

Happy Stamping !!!!
         Sue

Monday, March 26, 2012

Sneak Peak - Petite Purses

Good Morning Ladies,

I wanted to share a Sneak Peak of the Petite Purse Die with you today.  This Die is certainly a must have!  Makes the cutest little Purses that you've ever seen!   So easy to make, only takes about 10 minutes to create them.  Really !! 


Here's a group picture of three of them.  Here's another Sneak Peak for you, two of the Purses are made using the Summer Smooches Designer Paper.  Too Darling !!  The middle one is made using the Blushing Bride In Color Prints Designer Paper.  I used the In Color and the Brights Glimmer Brads for two of the Purses.  I also used White 5/16" Brads on the other one. 


Here's a close up of one where I added a little twist for the handle.  If you cut a piece of card stock that is 5 3/4"x 3/4" you can use the Scallop Trim Border Punch on each side of the cardstock and have your handles look like this.  This one I added a piece of whisper white cardstock to the handle piece.  Now I saw this idea on Sandy Hancock's blog.  She said it wasn't her idea, however it wasn't mentioned as to who actually did.  But I simply LOVE how it dresses up the Purse.

Just imagine making Party Favors, Shower Favors, Birthday Gifts with a little surprise inside.  Mary Fish used the Petite Purse die to make a cute little Backpack.  This weekend I even saw one made into a little Diaper Bag.  How cute would that be as a Baby Shower Favor.  The ideas are many!!

So be sure you put the Petite Purse Die on your Wish List for next month's Sneak Preview!

Thank You for stopping by today!

Happy Stamping !!!
         Sue 

Wednesday, March 21, 2012

Cute Bunny Card

Happy Wednesday !!  Well the other day I shared the March Stamp Club projects with you.  Today I wanted to share the Adorable Bunny Card that goes with the Bunny Basket.  This cute Bunny card is also a Dawn Griffith idea based on the Bunny Basket that she created.  You really have to make them both! 

So here is the cute Bunny Card!!


This is just the cutest Bunny face !!  It's made using the Heart Collection Framelits.  The face is made exactly the same as the Basket, using the same punches.  You just fold your cardstock and then leave a small space at the top of the Heart, so you end up with the fold at the top.


What a cute pair they would make at Easter!!  Just in case you want to check these two FUN projects out, here's the link to the video that Dawn has on her blog.  Just click ( Here ) .

Thanks again Dawn for sharing your creativity !!

Just wanted to Thank Everyone who has stopped by to check out my blog.  Today I reached 50,000 hits on my blog !!!  Woo Hoo !!  I was so excited, I took the big leap into blogger world about 18 months ago.  It's been so much FUN to share what I LOVE to do!! 

Happy Stamping !!!
        Sue 

Monday, March 19, 2012

March Stamp Club

Good Evening Ladies,

Today I have the March Stamp Club Projects for you.  First I thought I would share my display table that night as I had quiet a few things for them to browse and take pictures of.


They came with cameras in hand to take all kinds of pictures of the projects on the table.

Our Theme this month was Easter, so let's get started.


Here's the Group picture of all the FUN projects that we made.  From the left we have the Bunny Topper and next is the Everybunny Easter card and lastly we have the cutest Bunny Basket ever!!


This cute Bunny Topper I saw over at Dawn Olchefske's blog - DOstamping with Dawn.  This is my take on Dawn's Topper as I did change up some of the punches that were used to make the Bunny, but that's about it.  Punches used were the Blossom Punch, Wide Oval, Large Oval, Small Oval, then I used the Owl Punch for the Heart, the Cheeks, the Eyes and the Tongue.  You can check out Dawn's Bunny Topper by clicking  ( Here ).   Thanks for the Inspiration Dawn!


It's a Happy Easter Everybunny!!!   Love the soft colors of this card, along with some texture. 

Recipe:
Stamp Set - Everybunny
Cardstock - Pool Party, Whisper White
Sweet Shoppe Specialty Designer Paper
Black Stazon Ink, Markers- Blushing Bride, Pool Party, Daffodil Delight, Calypso Coral, Wisteria Wonder, Crumb Cake
Basic Jewels Pearls, Snow Burst Embossing Folder, Labels Collection Framelits, and of course the Big Shot.

And for the Grande Finale !!!


Is this not the cutest Bunny Basket ever !!!!  I originally had another Easter Basket planned, but when I saw this one on Dawn Griffith's blog.   I just couldn't resist not changing my mind.  Dawn has a video on her blog to show you how this Bunny Basket is made.  You can check out her video by clicking  ( Here )   Doesn't this Bunny face just make you SMILE !!!!   Thanks Dawn for sharing this darling Bunny Basket!!

Thanks to you all for stopping by and checking out the March Stamp Club Projects!

Easter is right around the corner, so take a break and get started on your Easter gifts!!

Happy Stamping !!!
        Sue 

Monday, March 12, 2012

Fresh Vintage Card and Purse

Good Morning Ladies,

I wanted to share this really cute Fresh Vintage Card and Purse with you today.  I'm pretty sure that Lisa Martz was the original creator of this, but now I can't find her post.  When I saw this a few weeks ago I knew that I had to give this a try.  It would be perfect for a Birthday or even Mother's Day.


Here's a picture of both the card and the purse.  So Elegant !!


Below is a closer view of the Fresh Vintage Card.


I just love all the colors in this - Peach Parfait, Blushing Bride, Pear Pizzazz.  The Designer Paper is  the Twitterpated Design from the Occasions Mini. 


This cute little purse is made using the Box #2 XL Bigz Die and then with the Labels Collection Framelits cut 2 of the #5 Label for the front and the back attaching them to the box.  Blushing Bride Poly Stitched Ribbon as an accent.  I really think the Basic Jewel Pearls on the front adds that special finishing touch. 

A Big Thank You to Lisa for sharing this!  It was on a blog hop tour, so if I find the post I will add a link. 

Thanks for stopping by today !!!

Happy Stamping !!!
        Sue 

Friday, March 9, 2012

Hostess Gifts for Stamp Club

TGIF Ladies, 

I'm so glad that it's Friday.  Today I wanted to share with you an awesome Hostess Gift that I saw over at  Gettin Crafty - Cristena  Bagne's blog.  Perfect timing as I needed to come up with a new Hostess Gift for the next round of Stamp Club.  I LOVE it when this happens!

So here it is:


Isn't this the most adorable Hostess Gift !!!  

It's a Card Holder with 3 Note Cards and Envelopes inside.  The Card Holder is made using 2 Medium Envelopes.  Then using the Mixed Bunch stamp set you are ready to start decorating.  The only thing that I changed was I did decide to put a Basic Jewel Pearl in the center of the Flower on the front.                                                         (Not pictured above as it was an after thought.)
So easy to make and Cristena has a video to show you how.
Just click on the link  ( Here ) 


Here's a closer view of the Wisteria Wonder one.


Here's another view of the Pool Party one.


I also made one using Calypso Coral, but I didn't take a picture of that one yet.

A BIG  Thank You to Cristena for sharing this awesome project and video!!

Hope you give this one a try, it would be perfect for a Birthday Gift or even Mother's Day !!

Thanks for stopping by today !

Wishing you a wonderful weekend!

Happy Stamping !!!
Sue

Wednesday, March 7, 2012

Easel Calendar

Just a short post today.  I saw these Easel Calendars over at Barb Mullikin's blog the other day and I had some extra calendars that needed a home.  So I decided to make them up for some friends of mine.
I didn't change much,  I added some Basic Pearls and another butterfly.  I just loved how Barb did hers.

So here's a picture of all of them.


These were really easy to make and they are a wonderful addition to someone's desk. 


Here's a close up picture so you can see all the details.

Stamp Set:  Creative Elements
4 x 8 piece of Peach Parfait card stock scored at 2" and 4". 
Poppy Parade, Pool Party, Lucky Limeade and Very Vanilla cardstock.
Everyday Enchantment Designer Paper
Poppy Parade Ink
Basic Pearls 2 sizes, Beautiful Wings Embosslit, Large Oval Punch, Scallop Oval Punch, Scallop Square Bigz Die and of course the Big Shot. 

Thanks To Barb for sharing this idea !!!

Thanks for stopping by today !!

Happy Stamping !!
        Sue

Sunday, March 4, 2012

February Stamp A Stack - Part 2

Good Evening Ladies,

I hope that you've had a wonderful weekend!   As I mentioned yesterday I still have 2 more cards to share from the Stamp A Stack.  So just in case you missed the post from yesterday, let's start with the group picture again of the 5 Designs.   Card creations are by Susan Campfield and Brenda Cardinal.


So let's start where we left off then with the 4th Card.  

The Vintage Butterfly Card.  Upper center card.


Stamp Sets:   Fresh Vintage,  Perfectly Penned - was used for the inside greeting
Cardstock: Calypso Coral, Poppy Parade
Designer Paper:  Everyday Enchantment
Ink:  Poppy Parade, Calypso Coral
1/8" Calypso Coral Organdy Ribbon, Butterfly Punch

For the 5th and Final card located in the Upper right hand corner we have:  You're My Type Card


Stamp Sets:   You're My Type, Teeny Tiny Wishes
Cardstock: Basic Black, Very Vanilla
Designer Paper: First Edition Specialty
Ink: Stazon Black, Real Red, Basic Black
1/4" Real Red Grosgrain Ribbon

I would like to "Thank" both Susan and Brenda for their awesome creations for this Stamp A Stack!
I hope that you enjoyed them as much as we did making them. 
The next Stamp A Stack is scheduled for June and the NEW Catalog will be out as of June 1st !!  
A whole month earlier than in past years.   Woo Hoo !!!

Happy Stamping !!!
        Sue

Saturday, March 3, 2012

February Stamp A Stack - Part 1

As promised I have the Stamp A Stack cards to share with you today.   This is the first one for this year.  With Sale-A-Bration currently in full swing you'll see some of the products for that.  The card creations for the Stamp A Stack are created by Susan Campfield and Brenda Cardinal. 

Here's the Group Picture of the 5 Designs that we made.  Everyone makes 3 cards of each design to have 15 finished cards to take home when they leave.


First up is the Apothecary Card - bottom right.


Stamp Set:  Apothecary Art, Loving Thoughts
Cardstock:  Wisteria Wonder, Whisper White
Ink:  Concord Crush
Labels Collections Framelits, Petal Cone Bigz Die, Dazzling Details


 Next we have the Elementary Elegance Card - Bottom Left.


Stamp Set:  Elementary Elegance
Cardstock: Crumb Cake, Soft Suede, Poppy Parade, Naturals Ivory
Ink:  Soft Suede, Poppy Parade
Everyday Enchantment Designer Series Paper, Curly Label Punch, 1/2" Very Vanilla Seam Binding Ribbon


The third card is the Enchanted Blossom card - Top Left


Stamp Set:  Fresh Vintage, Loving Thoughts, Curly Cute (inside greetings)
Cardstock:  Very Vanilla, Lucky Limeade, Poppy Parade, Naturals Ivory
Ink: Baja Breeze
Everyday Enchantment Designer Series Paper, Blossom Punch,
1 1/4" Circle Punch, 1/8" Lucky Limeade Organdy Ribbon

 I will be posting part 2 tomorrow, so stop back by to check the last 2 cards out.

Happy Stamping !!!
         Sue 

LinkWithin

Related Posts Plugin for WordPress, Blogger...